
Every homeowner probably hoards a lot of things in their garage, but what matters is that you keep the important stuff in it as well. You never know what could happen where something could come in handy, and if you frequently work with cars, then it’s crucial to be prepared.
Gadgets You Need In Your Truck

Driving a truck might be fun, but if you do not have the right gadgets it can turn from being fun to being quite exhausting. If you are wondering how you can make your driving experience a lot better than it already is, feel free to read until the end of this article.
Where to Sell a Car in Chicago?

You might have come into possession of a car lately, and it might be that you no longer want it. Otherwise, as it would make better sense, it may be that you would like to sell your old car. Well, if you were anywhere else in the world, to just ‘go for it’ would have sufficed, but it just so happens that you’re in Chicago.
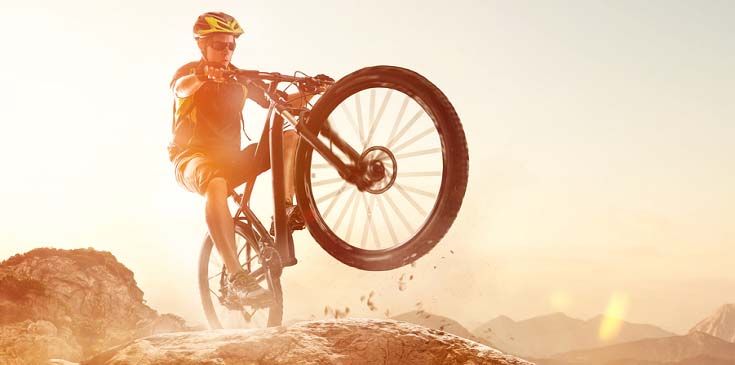
How To Choose A Mountain Bike – 6 Factors That You Need To Know
Whether you are a seasoned athlete or just a newbie like me, we all know that mountain bikes are quite expensive. In fact, some upgrade models cost upwards of $10,000. As you have to spend a decent amount of bucks for buying a bike, it’s pretty obvious you want to make sure you got the best one.
There are plenty of reasons why mountain bikes are so popular even at a high price range. Though they usually are pretty pricey, still you can find some top quality mountain bikes under 200 dollars. In this how to choose a mountain bike article, we will help you to understand some basic thing about the mountain bike. So let’s start.
Know Different Types Of Mountain Bikes
Over four decades, this amazing two-wheeled mountain bike has dominated the cycling world. In fact, millions of people are addicted to mountain bike all over the world. As time goes, the mountain bike becomes one of the top sellers in the United Kingdom and the United States.
Cross Country Mountain Bikes
Cross country is the most popular and common type of mountain biking. The feature makes this types of mountain bike so popular. This doesn’t involve utmost obstacles like another type of mountain bike. The best thing about this cross country mountain bike is it allows long periods of climbing. The incorporated trails and banked turns make it more efficient.
All Mountains Bikes
Generally speaking, all mountains bike is more who want something like action-packed. However, it involves challenging obstacles and more varied terrain. At the same time, it comes with mountain’s all natural features like jumps and drops. As they are incredibly challenging, you need great skill and fearlessness to handle it.
Downhill Mountain Bike
Downhill riding is not for someone who wants smooth, buttery speed. In fact, novice rider doesn’t normally use any specific trail at all. As an alternative, they usually use focus and control at the possible fastest speed. Thus, downhill bikes got slack head angles of 65 to 66 degrees. And the Suspension travel of this type of bike is in the region of 140mm – 160mm.
Four Cross Mountain Bike
Four cross or 4X is actually for Rough Rider who pitted against each other in some kind of natural and human-made obstacles. In a word, it is actually for the race. As a result, it is pretty challenging. Hence, it comes with hills, bumps, sharp turns, jumps and steep drop-offs.
Dual Slalom Mountain Bike
You may see the Dual slalom is Olympic skiing events. In dual slalom, usually two bikers race to the bottom of a hill.
More Mountain Biking Categories
There are some other more leisurely yet potential daring categories of a mountain bike.
- Trials: Trials are pretty exceptional regarding speed. However, it is all about balance, agility, and a little bit of creativity.
- Urban/Street: Mostly known as freestyle, urban or bicycle motocross. The urban riders are sliding down handrails, banking the wheels off, jumping over benches or even playground or in the middle of cities.
- Dirt Jumping: It pretty similar to urban BMX for those incorporates jumps and tricks. But the main difference is in the tricks are executed on mounds and dirt hills.
- Freeride: This bike is perfect for do-anything, go-anywhere type. In a nutshell, it’s an all-around bike.
6 Factors To Consider When Choosing A Mountain Bike
From the 1970s to 1980s, mountain bike had gained enormous popularity. As a result, numerous manufacturers tend to produce different types of bike on specifically designed. So when you try to pick a mountain bike, the options may seem staggering, from suspension to frame geometry, tire tread and brake. So some essential thing you should consider. Let’s have a look.
1. Choose The Right Size

First of all, the exact bike for you is heavily depends on what you plan to do with it. But as we mention earlier, the more aggressively you want to use, the more advanced features you will need for your bike.
Of course, advanced features bikes will be expensive. As a general rule, you will get these types of features on 1000 dollars mountain bikes. All we want to say is ensure that the bike is the right fit for you.
2. Get The Right Wheel
 What will be the right mountain bike wheel for you, it hugely depends on the way you feel the wheel underneath you. Though we don’t give much concentration on here, it an important factor. The way to understand it is to try the wheel by a demo ride.
- 26″ Wheels: 26″ wheel is less common on this day. But they have some noteworthy features like strong, light and quick. But they are not perfect for rocky, technical terrain.
- 27.5in. Wheels: Also known as 650b wheels, we usually see these types of the wheel in most of the Mtb under 500. They ensure fast start and Combine responsiveness with agility. But it comes with less traction compared to 29ers.
- 29in. Wheels: After decades of 26in, 29ers changed the total wheel game. Though they are heavier than all three size, they come with more solid traction and amazing ability to overcome the obstacles.
3. Choose The Right Mountain Bike Frame
Most important feature to look for a mountain bike is its frame. Thus, the reason is pretty simple- you can upgrade brakes, gear sets, and other features, but the only thing can’t upgrade the frame. However, the two main aspects of frames to consider are geometry and material. Let’s see some common frame material.
- High-Tensile Steel
- Chromoly Steel
- Aluminium
- Titanium
- Carbon fiber
4. Select The Right Suspension
 Which suspension will be right for you? Each element of suspension added weight and complexity to the bike. The bearing, rear shocks, and linkage of full suspension all cost money. Furthermore, you will be glad to get much better parts on a hardtail over full- suspension at the same price. In our previous article Best mountain bikes under $300 you can get a few such full suspension and hardtail bike. However, there are three types of suspension. Those are:
- Full Suspension: A rear suspension and front fork.
- Hard Tail: No rear suspension and a front fork.
- Rigid: There is no suspension at all.
5. Brakes Look for the Right Mountain Bike Brakes
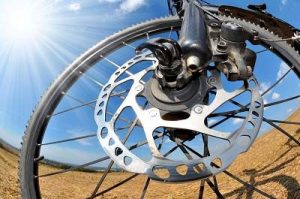 Though there are two types of the brakes are available on the mountain bike, disc brakes are more familiar nowadays. If you need entry level bikes, then go for Rim brakes. Otherwise, Disc brakes have replaced rim brakes on all but entry-level mountain bikes.
Disc Brakes: Most of the cases Disc brakes have replaced rim brakes except entry-level mountain bikes. The best thing about disc brakes is it gives a more consistent performance in all condition. Disc brakes have two versions.
Hydraulic disc brakes come with strong braking and more progressive features. Cable-activated brakes are more manual adjustable.
Rim Brakes: As we mentioned earlier, you can see Rim brakes only on some entry-level mountain bikes. The main advantage of these types of brakes is they are pretty economic. But also have some downside like less effective in muddy or wet.
6. Choosing A Mountain Bike Saddle
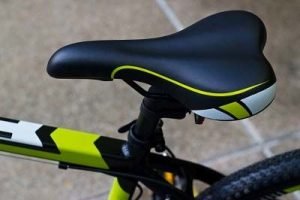 You can’t overlook the saddle while choosing a mountain bike. It supports the rider’s weight and provides lateral control. The wrong saddle can cause discomfort in a long ride and reduce the confidence to control the bike.
Three Questions To Think Twice Before Choose A Mountain Bike
1. What Am I Going To Use This Mountain Bike For?
The terrain you want to ride is all matter for determining what type of mountain bike is right for you. Some may want a mountain bike just as a commuting vehicle. Some people may want for both commuting on-road and some fun off-road. By knowing the different categories, you may determine your requirement and goal. We discussed the various types of detail in above.
2. What About The Budget?
More or less, we all know mountain bikes are pretty pricey. There are some models which may cost a few thousand dollars or even more. So the budget is a vital factor. But as a general rule, the more the price goes you, the more quality and better performance you may expect from. So before deciding what to pick first look at your budget.
3. Can I Try Before Buy A Mountain Bike?
Once you can narrow down your list with just a couple of options, try to go for a ride. Nothing could be better than try it and decide what will fit for me.
Preventative Mountain Bike Maintenance
To keep squeals painful creaks away, try to maintain some simple maintenance:
- Keep the chain lubed and clean, and have bike’s tires pumped before you ride.
- Before every ride check the brakes.
- Clean your bike after every ride to wash Grit and dirt. And if you go for a ride on a muddy condition, cleaning is the must.
- Know how to adjust your suspension and fix a flat tire.
Wrapping Up
Mountain biking can be a very exciting and thrilling sport. To a passionate mountain biking enthusiast or even a new rider, knowing some basic things will be beneficial in choosing the right mountain bike for you. Therefore, in this article, we tried to focus on some crucial things you need to consider to stay safe and comfortable.
Most importantly, a good fit mountain bike can make a big difference. Don’t be fooled by those fancy specification manufacturer attached to the bike. Before investing in such a decent amount, go for a test ride to understand which one is right for you.
How To Build A Mountain Bike – 8 Steps To Assemble Mountain Bike
Can I build my mountain bike by myself? Yes, you can build your own mountain bike by yourself. It’s easy to work on, fun to customize the bike and even more pleasure to ride around. Generally, you should at least have some maintenance knowledge of your bike, like adjusting your derailleurs and changing your tires.
These simple skills will help you a lot to build your own bike. However, it’s always best to follow the owner’s manual to complete the job properly.
Essential Parts Needed To Build A Mountain Bike
You will need these following parts to build your own mountain bike.
- Frame
- Front and rear wheel
- Tires
- Tubes
- Stem
- Handlebars
- Derailleur/Derailleurs
- Shifters
- Cassette
- Headset
- Fork
- Brakes
- Seat
- Seatpost
- Saddle
- Chain and Gears
- Pedals
Tools Needed To Assemble A Mountain Bike
For doing this job perfectly you will need several tools, such as:
- A set of metric Allen keys
- Wire cutters
- Phillips head screwdriver
- Wrench
- Lubricant
- A rag
8 Steps On How To Assemble A Mountain Bike
Here are the steps to assemble a mountain bike accurately. Hopefully, you can assemble your bike properly by following these steps.
Step 1: Unpack The Box And Lubricate The Parts
Before you begin, open the box and carefully pull everything out of it. Check the tools carefully and make sure you have everything you need. Do not throw anything away until you are done. Check the owner’s manual to ensure that which parts should be lubricated.
Check your bike to place any metal parts that will come into direct contact with other metal parts. Apply lubrication here to prevent any damage from friction and corrosion. Such areas will probably include parts like the quill stem, seat post, seat tube, and threads.
Step 2: Attach Seat And Seatpost To The Frame
To set up the seat to the seat post, loosen the clamp on the seat post. Put in the seat post into the seat tube. Apply a small amount of bike grease or lubricant to the seat post before inserting it. Push the seat in until the minimum insertion mark is inside the tube. Finish the step by either clamping down the quick release lever or using a hex wrench to tighten. Once you’ve done, secure the seat post in the right place so it isn’t jarred out of place as you ride. Once the seat post is secure, move on to the saddle. If necessary, adjust its position so it’s centred over the post. Now tighten the bolts to fix it.
Step 3: Set Up The Handlebar To The Stem
Now it’s time to set your handlebar to the stem. Inspect the cables to make sure that they are in the correct position. Now remove the stem bolts and faceplate. Attach the handlebar in the stem and loosely re-secure the faceplate to the stem.
Make sure that your cable routing is suitable and there’re no harsh bends or twists in the cable. Once the handlebar is loosely attached in the stem, ensure that it’s positioned correctly and symmetrically before tightening the faceplate bolts. When tightening the faceplates bolts, tighten them alternately and equally. Make sure that the faceplate is equally tight on every side.
Step 4: Install The Wheels
First, go over each side of the wheel to make sure each tire are attached correctly on its rim. Look along the rims to confirm that the tires are evenly placed over the rims. Adjust them if necessary. For installing both the front and rear wheels, line up the axle with the dropouts.
At this point, tighten all bolts. As you do, tighten each bolt just a little bit at a time, move on to the others and tighten them just as much and repeat it until you’re done. After that, make sure that the wheels are still centred between the forks.
[su_button2youtube url=”https://www.youtube.com/watch?v=PYckLJ25XkM” width=”740″]
Step 5: Attach The Pedals Accurately
At first, identify which is which by checking the spindles. Find out the L and R markers gradually. Use the R pedal on the right side of the bike and L pedal on its left. To attach them properly, screw each pedal to its corresponding thread with your hands at first.
Turn clockwise for the right pedal and counter-clockwise for the left. Then tighten them firmly with a wrench into place as you near the end.
Step 6: Set Up And Adjust The Brakes
At first, slide the brake levers to the handlebars. Simply screw each arm into one of the post mounts to set cantilever brakes. Locate the brake pads so that they align with the braking surface on the wheels.
Normally disc brakes come pre-assembled which makes the installations somewhat easier. To set disc brakes, loosely screw in the disc brakes onto the frame. Squeeze the brake levers to make sure that they’re properly engaging. Adjust your brakes if necessary.
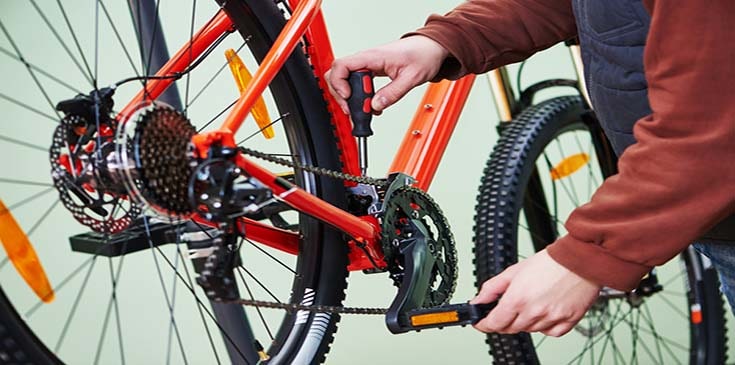
Step 7: Attach The Chain
Using a power link is an easier way to attach the chain of your bike. With a power link, you can attach the chain without tools. At first, route the chain through the derailleurs and bring them together under the chainstay. Then join one half of the power link to one side of the chain and the other half of the power link to the other side.
Now bring the two ends of the chain together and connect them with the power link. Turn the cranks backward so that the power link is now above the chainstay. Give the crank a quick yank forward to lock the power link in the right place.
Step 8: Adjust Derailleurs
To adjust the derailleurs, you need to adjust the upper-limit screw, lower-limit screw, and the barrel adjuster. At first, shift your derailleur into its lowest setting. Use the lower-limit screw to adjust the position of your derailleur so that it lines up with the lowest gear.
Repeat the same method with the upper limit screw and the highest gear. Ensure that your derailleur can shift into the highest and lowest gears. Now screw the barrel adjuster in and out until you reach your preferable point. Rotate the pedals and shift through all the gears to ensure that your bike shifts smoothly through the full range of gears.
Final Words
Finally, go over each bolt you installed and check them carefully to make sure that everything is tight. Make it sure that you haven’t overlooked anything or made any mistakes. However, if you want a readymade bike at a reasonable price, you can choose an MTB that cost $300.
14 Amazing Bike Concepts That We Might Or Might Not See In the Future

Every person is different, that’s a given, so what makes one happy varies from person to person, that’s just how life is. It is often considered that our interests are what defines as a person. Most people use cars to move around but of course there are those of us who prefer something a bit different like a motorcycle, even better a customized motorcycle which suits our personal needs.
Mokka Turns Garelli’s Retro KL50

World’s motorcycle community always pay their respects to the platforms who were popular half a century ago. The reason is that they want to pay their respects to the founding fathers of motors, who are one of the most popular vehicles ever, period. Now we are going to talk about Garelli`s. This company is not a giant like Yamaha, Honda, Kawasaki, and Suzuki. However, this Hungary-based company is a brand that made the name for itself in recent years.
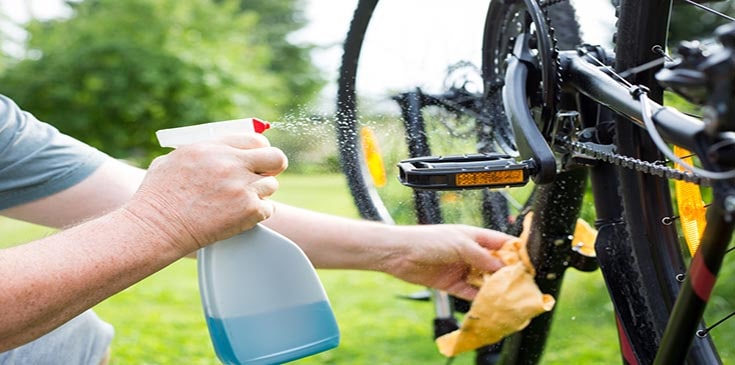
How To Clean A Mountain Bike In 6 Easy Steps

A clean mountain bike doesn’t just look better; regular cleaning will help your machine run smoother for longer. It is important to maintain a regular cleaning routine to protect your favorite bike from any unexpected damage.
However, cleaning a mountain bike is not that much difficult. With proper instruction, you can clean your bike easily. In this post, I’ve added a proper guideline with an easy cleaning process. I’ll also share with you some cheap mountain bikes for 200 dollars. Let’s check it out to know more.
What you will need to clean your mountain bike
Before starting the cleaning process of your mountain bike, make sure you have all the appropriate supplies. There is a list of all the things that you will need to clean your mountain bike easily.
- A bucket
- Brush and sponge
- Chain scrubber
- Chain lubricant
- Water repellent
- Some cleaning products
- Warm water
Steps On How To Clean A Mountain Bike Properly
There is a step by step instruction for you so that you can clean your mountain bike effortlessly.
Step-01: Find The Right Place To Wash Your Bike
First of all, it is important to find an appropriate place to wash your Mtb. It is best to wash the bike on a hard or easily draining surface such as gravel.
Clamp your bike into a bike stand, and this will help you to get into the hard to reach places. When clamping your bike, make sure it is upright and can’t fall over. However, if you don’t have a solid bike stand, you can flip your bike over on the seat and handlebars.
Step-02: Rinse Your Bike With Normal Water
Now take a water hose and rinse your bike with cold water completely. It’s best to use low pressure to do this as high pressure can damage seals and other delicate components. This primary step will remove all loose dirt on the bike and loosen up dried grime.
Step-03: Apply The Cleaner And Make A Scrub
Using warm and soapy water is fine but this is not as effective as an all-purpose cleaner. This cleaning product will cut through grease, dirt and mud, and even the lubricant you put on your chain before.
Spray the cleaner on the bike thoroughly and leave it to work for at least 2 minutes. Once it’s sprayed down, take a soft-bristled brush to make a scrub of your entire bike including frame, seat, wheels, and tires.
This way all dirt and mud should come off easily. Once you’re done with that, take your water hose and spray down your bike again.
Step-04: Clean The Tires And Drivetrain
Now it’s time to clean the tires and drivetrain of your bike. The drivetrain includes all parts that let you pedal the bike, from gear and derailleurs to cranks and chainrings.
It’s important to clean the gear sets completely because this part piles up lots of greases, grime, and dirt. Use a firm brush and warm water, apply washing liquid directly to the brush and scrub onto the tires.
Remove dirt and grime from between the tread and around the sidewall and rim. Now move to the drivetrain and cassette. Remove any sticks, grease or other debris caught between cogs or stuck on jockey wheels then scrub with the firm brush and cleaner.
[su_button2youtube url=”https://www.youtube.com/watch?v=TMmjygdQAoQ” width=”740″]
Step-05: Rinse The Bike And Make An Inspection
Rinse your bike using your low-pressure water hose from top to bottom with normal water. Check the bike for any damage to the frame, components, and wheels. Spin the pedals at the same time allowing water to run easily through the links on the chain.
Step-06: Dry And Lube The Suspension And Chain
The final step of this cleaning process to lube and spray the correct parts on the bike. Take a clean and soft cloth to remove any excess water from your bike with it.
Make sure to run it across every part of the bike including the frame, forks, cockpit, and wheel. After cleaning and dying, slowly turn the pedals and apply a single drop of lube to every 2-4 links, where one link meets another.
When you’re done with chain, move to your gears and apply 10-12 drops, ensure that everything has an even coating. Wipe any excess lube with your rag when you’re done because extra lube can hold dirt and lead to grime. Be aware not to go near the rotor; you can pop a plastic bag over the brakes to protect it.
Last Thought
In conclusion, with this simple and easy cleaning process, you can wash your mountain bike within 10-15 minutes. However, if you’re in a hurry you can clean your bike just using a water hose or warm water and a sponge. Lubricate is not highly necessary unless the bike chain feels dry.
BMW Has Patented An Electric Supercharger For Their S1000RR Bike

The German heavyweight car and bike manufacturers BMW decided to make their S1000RR even faster. Thanks to their recent patent with the German Patent and Trademark Office, they have come up with the electric supercharger.
Tips To Avoid A Motorcycle Accident

Ignorance kills. This statement is not a mere cliché. It serves as a warning to motorists and all the drivers out there. Do you want to be spared from the dangers of a motorcycle accident? Make sure you’ve equipped yourself not just with safety gear but as well as all the knowledge you need to become a well-informed driver.